本文主要介绍DVR的概念,比较了DVR和非DVR情况下,数据在network节点上的流量变化。同时也介绍了在OpenStack里面如何配置DVR,比较详细地介绍了在DVR激活的情况下,数据包的流表情况。

DVR 简介
DVR 提出的背景
在Neutron的网络环境中,跨子网的虚机通信是需要通过Neutron的路由器。这既包括不同子网的虚拟机之间的通信,又包括虚拟机与外网之间的通信。在DVR被提出之前,由于Neutron的legacy router只会部署在网络节点上,因此会造成网络节点的流量过大,从而产生了两个问题,其一是网络节点将成为整个Neutron网络的瓶颈,其二是网络节点单点失败的问题。在这样的背景下,OpenStack社区在Juno版本里正式引入了DVR(Distributed Virtual Router)。DVR,顾名思义就是Neutron的router将不单单部署在网络节点上,所有启动了Neutron L3 Agent的节点,都会在必要时在节点上创建Neutron router对应的 namepsace,并更新与DVR router相关的Openflow规则,从而完成DVR router在该节点上的部署。在计算节点上部署了DVR router后,E-W方向上的流量不再需要将数据包发送到网络节点后再转发,而是有本地的DVR router直接进行跨子网的转发;N-S方向上,对于绑定了floating IP的虚机,其与外网通信时的数据包也将直接通过本地的DVR router进行转发。从而,Neutron网络上的一些流量被分摊开,有效地减少了网络节点上的流量;通信不再必须通过网络节点,也提升了Neutron网络的抗单点失败的能力。
本文主要讲解的是E-W方向上的虚拟机通信情况。
非DVR和DVR情况下,网络节点流量对比
这是在有相同数量的虚机的情况下的对比。
- 非DVR的情况,网络节点的流量情况
|
1
2
3
4
5
6
7
8
9
10
11
12
13
14
|
[root@test114 openvswitch]# ifstat
#kernel
Interface RX Pkts/Rate TX Pkts/Rate RX Data/Rate TX Data/Rate
RX Errs/Drop TX Errs/Drop RX Over/Rate TX Coll/Rate
lo 19090K 0 19090K 0 18446744071513M 0 18446744071513M 0
0 0 0 0 0 0 0 0
eth0 116688K 0 1737K 0 674575K 0 555880K 0
0 0 0 0 0 0 0 0
eth3 118480K 0 286 0 18446744070647M 0 71696 0
0 0 0 0 0 0 0 0
br-eth3 8650K 0 80 0 1580M 0 3360 0
0 1127 0 0 0 0 0 0
br-ex 10276K 0 1737K 0 18446744071533M 0 555877K 0
0 1127 0 0 0 0 0 0
|
- 在DVR enabled的情况下,网络节点的流量情况
|
1
2
3
4
5
6
7
8
9
10
11
12
13
14
|
[root@test114 ~]# ifstat
#kernel
Interface RX Pkts/Rate TX Pkts/Rate RX Data/Rate TX Data/Rate
RX Errs/Drop TX Errs/Drop RX Over/Rate TX Coll/Rate
lo 2155 0 2155 0 790717 0 790717 0
0 0 0 0 0 0 0 0
eth0 10461 0 213 0 2310K 0 88001 0
0 0 0 0 0 0 0 0
eth3 10683 0 0 0 2399K 0 0 0
0 0 0 0 0 0 0 0
br-eth3 528 0 0 0 90626 0 0 0
0 0 0 0 0 0 0 0
br-ex 800 0 213 0 173756 0 88001 0
0 0 0 0 0 0 0 0
|
在非DVR和DVR的情况下,数据包流经各节点的对比
DVR支持VLAN、GRE、VXLAN这几种网络类型,但因为方便起见(VLAN需要开启路由器的Trunk口),所以本文中,我们这就用 GRE作为环境的网络类型。我们这里的环境情况如下:
网络节点是test114.sce.ibm.com, 两个计算节点分别是test115.sce.ibm.com和test116.sce.ibm.com,两个私有网络分别是gre(192.168.11.0/24),gre1(192.168.12.0/24),都是GRE类型的,它们通过router相连,在两个计算节点上面分别有一台虚拟机,它们分属不同的网络。这里面VM1在test115.sce.ibm.com上,ip地址是192.168.11.3,VM2在 test116.sce.ibm.com 上,ip地址是192.168.12.4。
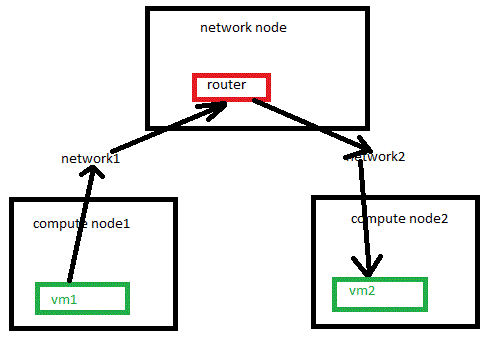
- 非DVR的情况:

图1 非DVR
|
1
2
3
4
5
6
7
8
9
|
[root@test115 ~] tcpdump |grep -i "gre"
18:14:11.794450 IP test115.sce.ibm.com > test114.sce.ibm.com: GREv0, key=0x1, length 106:
IP 192.168.11.3 > 192.168.12.4: ICMP echo request, id 16641, seq 23588, length 64
18:14:11.794550 IP test114.sce.ibm.com > test116.sce.ibm.com: GREv0, key=0x2, length 106:
IP 192.168.11.3 > 192.168.12.4: ICMP echo request, id 16641, seq 23588, length 64
18:14:11.796136 IP test116.sce.ibm.com > test114.sce.ibm.com: GREv0, key=0x2, length 106:
IP 192.168.12.4 > 192.168.11.3: ICMP echo reply, id 16641, seq 23588, length 64
18:14:11.796198 IP test114.sce.ibm.com > test115.sce.ibm.com: GREv0, key=0x1, length 106:
IP 192.168.12.4 > 192.168.11.3: ICMP echo reply, id 16641, seq 23588, length 64
|
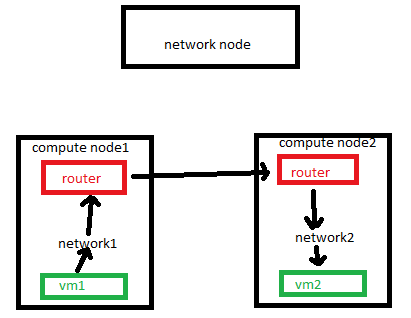
- DVR的情况:

图2 DVR
|
1
2
3
4
|
16:34:02.479531 IP test115.sce.ibm.com > test116.sce.ibm.com: GREv0, key=0x2, length 106:
IP 192.168.11.3 > 192.168.12.4: ICMP echo request, id 10241, seq 19852, length 64
16:34:02.482082 IP test116.sce.ibm.com > test115.sce.ibm.com: GREv0, key=0x1, length 106:
IP 192.168.12.4 > 192.168.11.3: ICMP echo reply, id 10241, seq 19852, length 64
|
在非 DVR 的情况,数据是要通过网络节点才能相互传递数据包;在 DVR 的情况,数据包是直接在两个计算节点上传递。
配置DVR
配置文件
在网络节点和计算节点配置DVR:
- 网络节点:因为 DVR 是属于 l3-agent 的功能,并依赖于 l3-agent,所以我们在这里的改动应该默认为环境上的 l3-agent 是可以工作的。具体配置如下:
修改对应文件:
neutron.conf : router_distributed = True
l3_agent.ini : agent_mode = dvr_snat
ovs_neutron_plugin.ini : l2_population = True and enable_distributed_routing = True
ml2_conf.ini : mechanism_drivers = openvswitch,linuxbridge,l2population
重新启动 neutron-openvswitch-agent, netron-l3-agent, neutron-server 服务。
- 计算节点:考虑到 compute node 上可能在 enable DVR 之前是没有启动/配置 DVR 的,那么参照 network node 上的 l3_agent.ini 去配置 compute node,启动 l3-agent。同时把 l3-agent 配置成 DVR 模式。还需要在节点上配置 br-ex 这个 ovs bridge,如果节点上在 enable DVR 之前没有这个 ovs bridge,并且如果 compute node 上的虚机需要与外网通信,那么 compute node 上的 br-ex 就必须桥接到一个可以连接到外网的网卡上。具体配置如下:
把节点配置成 DVR 模式:
l3_agent.ini : agent_mode = dvr
ovs_neutron_plugin.ini : l2_population = True and enable_distributed_routing = True
重新启动neutron-openvswitch-agent, netron-l3-agent 服务。
建立br-ex网桥,使得eth0上的ip地址转移到br-ex上。具体操作如下:
建立br-ex: ovs-vsctl add-br br-ex
把eth0桥接到br-ex里面:ovs-vsctl add-port br-ex "eth0"
建立ifcfg-br-ex,ifcfg-eth0 is in /etc/sysconfig/network-scripts。
重新启动网络服务。使得配置生效。
- 迁移到 DVR 模式。使得新添加的 l3-agent 能够管理 router,(如果是先 enabled DVR,再建立网络和 router,忽略这一步),具体操作如下:
在网络节点上执行如下操作:
neutron router-update --admin_state_up=False ROUTER
neutron router-update --distributed=True ROUTER
neutron router-update --admin_state_up=True ROUTER
查看router是否已经和三个l3-agent对应
|
1
2
3
4
5
6
7
|
[root@test114 ~]# neutron l3-agent-list-hosting-router router2
+--------------------------------------+---------------------+----------------+-------+
| id | host | admin_state_up | alive |
+--------------------------------------+---------------------+----------------+-------+
| 26a3a232-888b-4b6d-8f81-5bdd2b988414 | test114.sce.ibm.com | True | :-) |
| 818537d8-903a-4ff9-a745-2d562ab82e54 | test115.sce.ibm.com | True | :-) |
| 427b251d-b210-4782-9d96-858c30181dbe | test116.sce.ibm.com | True | :-) |
|
计算节点上的虚拟机的数据流的传递
当在虚拟机VM1(test115.sce.ibm.com)里面去ping VM2的IP的时候,数据包先转到宿主机的网桥br-int上,数据先传到那个和VM1的port匹配的port端口上,转到网关所在的那个端口,再转到namespace里,找到网关所在的端口,再转回br-int,然后通过br-int上面的patch-tun端口传递到br-tun这个网桥上,在br-tun网桥上的对应的端口通过trunk传递数据包到VM2所在的宿主机(test116.sce.ibm.com)的br-tun上的对应端口,再通过patch-int传到br-int上的patch-tun,通过br-int上的与VM2对应的port端口,把数据传递给VM2,完成数据包的传递。简单的可以写成vm1->br-int->namespace->br-int>br-tun->tunnel>br-tun->br-int->vm2。
DVR环境下Openflow规则的分析
OVS命令简介
Open VSwitch(OVS)是一个虚拟交换机,可以用来组成虚拟网络。OpenStack Neutron里面也是应用了OVS,Neutrondd的router虽然是工作在网络3层的,看似与2层的OVS无关,但实际上Neutron router在转发不同子网之间的数据流量时,还是需要借助2层Openflow规则,并且Neutron router的namespace中的子网网关的端口设备等都是需要接在OVS的网桥br-int 上才能工作的。DVR作为Neutron router的一种特殊实现,本质上也是依赖于OVS的,这一点与Neutron legacy router并无差异。在前面DVR的配置中我们用到了一些OVS的命令,这里再介绍一下OVS的一些命令:
- 查看open vswitch的网络状态:ovs-vsctl show
- 查看网桥br-tun的接口状况:ovs-ofctl show br-tun
- 查看网桥br-tun的流表:ovs-ofctl dump-flows br-tun
- 添加网桥:#ovs-vsctl add-br br0
- 将物理网卡挂接到网桥:#ovs-vsctl add-port br0 eth0
我们这片文章里面主要用到了以上五个个 ovs 命令。我们在提一下其它的一些命令。
- 列出 open vswitch 中的所有网桥:#ovs-vsctl list-br
- 判断网桥是否存在:#ovs-vsctl br-exists br0
- 列出网桥中的所有端口:#ovs-vsctl list-ports br0
- 列出所有挂接到网卡的网桥:#ovs-vsctl port-to-br eth0
- 删除网桥上已经挂接的网口:#vs-vsctl del-port br0 eth0
- 删除网桥:#ovs-vsctl del-br br0
数据包在br-int和br-tun上的流表
在前面的章节,大致描述了一下数据包的流动情况,在这里再来看一下 br-int 和 br-tun 上的流表,具体来看下数据包的传递。
当从VM1(192.168.11.14)去pingVM2(192.168.12.9), 数据包首先流到compute1(10.11.1.115)的br-int上,让我们先看看compute1上的网络状态。
|
1
2
3
4
5
6
7
8
9
10
11
12
13
14
15
16
17
18
19
20
21
22
23
24
25
26
27
28
29
30
31
32
33
34
35
36
37
38
39
40
41
42
43
44
45
46
47
48
49
50
51
52
53
54
55
56
57
58
59
60
61
62
63
64
65
66
67
68
69
70
71
72
73
74
75
76
77
78
79
80
81
82
83
84
85
86
87
88
89
90
91
|
[root@test115 ~]# ovs-vsctl show
1799e6ea-b3b0-4581-b42e-e1bfd8a5d96d
Bridge br-ex
Port "eth0"
Interface "eth0"
Port br-ex
Interface br-ex
type: internal
Bridge br-tun
fail_mode: secure
Port "gre-0a0b0174"
Interface "gre-0a0b0174"
type: gre
options: {df_default="true", in_key=flow, local_ip="10.11.1.115",
out_key= flow, remote_ip="10.11.1.116"}
Port br-tun
Interface br-tun
type: internal
Port patch-int
Interface patch-int
type: patch
options: {peer=patch-tun}
Port "gre-0a0b0172"
Interface "gre-0a0b0172"
type: gre
options: {df_default="true", in_key=flow, local_ip="10.11.1.115",
out_key= flow, remote_ip="10.11.1.114"}
Bridge "br-eth3"
Port "eth3"
Interface "eth3"
Port "phy-br-eth3"
Interface "phy-br-eth3"
type: patch
options: {peer="int-br-eth3"}
Port "br-eth3"
Interface "br-eth3"
type: internal
Bridge br-int
fail_mode: secure
Port "qr-43fad9d6-53"
tag: 1
Interface "qr-43fad9d6-53"
type: internal
Port patch-tun
Interface patch-tun
type: patch
options: {peer=patch-int}
Port "qr-c669122c-11"
tag: 2
Interface "qr-c669122c-11"
type: internal
Port br-int
Interface br-int
type: internal
Port "qvof76ecb29-5d"
tag: 2
Interface "qvof76ecb29-5d"
Port "int-br-eth3"
Interface "int-br-eth3"
type: patch
options: {peer="phy-br-eth3"}
ovs_version: "2.3.0"
[root@test114 neutron]# neutron port-list
+--------------------------------------+------+-------------------+-----------
---------------------------------------------------------------------------+
| id | name | mac_address | fixed_ips |
+--------------------------------------+------+-------------------+----------
----------------------------------------------------------------------------+
| 3086e492-b9b2-416a-9140-f01258c34dda | | fa:16:3e:e5:b9:08 | {"subnet_id":
"3eca2769-c97f-42a5-98e2-2ac41de54810", "ip_address": "192.168.11.2"} |
| ed6b11e8-05ea-4024-8d83-b080984f084e | | fa:16:3e:b4:76:32 | {"subnet_id":
"ffd2c101-35e5-4758-ba75-43409e58adaf", "ip_address": "10.11.2.14"} |
| cf9fa480-7fd4-4e4b-b8cf-7f6c26cffb2d | | fa:16:3e:02:b7:c7 | {"subnet_id":
"3eca2769-c97f-42a5-98e2-2ac41de54810", "ip_address": "192.168.11.13"} |
| f76ecb29-5d9d-41fe-ae70-098502fda347 | | fa:16:3e:17:6b:a7 | {"subnet_id":
"3eca2769-c97f-42a5-98e2-2ac41de54810", "ip_address": "192.168.11.14"} |
| 2bbd30d4-86d4-4ccb-930a-edb7be55b740 | | fa:16:3e:2a:34:19 | {"subnet_id":
"8678e8ff-5f76-411b-9357-d2ab6ea6125a", "ip_address": "192.168.12.9"} |
| 43fad9d6-53d3-4664-8fc1-defcfa21d78a | | fa:16:3e:a3:95:c2 | {"subnet_id":
"8678e8ff-5f76-411b-9357-d2ab6ea6125a", "ip_address": "192.168.12.1"} |
| da445e04-ab74-409b-b5df-1f5e8f7aa955 | | fa:16:3e:42:25:42 | {"subnet_id":
"8678e8ff-5f76-411b-9357-d2ab6ea6125a", "ip_address": "192.168.12.2"} |
| 76bfd868-976d-4483-8352-89e0522e213d | | fa:16:3e:d4:4d:ff | {"subnet_id":
"8678e8ff-5f76-411b-9357-d2ab6ea6125a", "ip_address": "192.168.12.10"} |
| 20f66057-a825-422c-9dfe-5bfa09292251 | | fa:16:3e:ee:70:14 | {"subnet_id":
"ffd2c101-35e5-4758-ba75-43409e58adaf", "ip_address": "10.11.2.10"} |
| c669122c-115f-42d5-b107-d346193cdb82 | | fa:16:3e:cd:50:8d | {"subnet_id":
"3eca2769-c97f-42a5-98e2-2ac41de54810", "ip_address": "192.168.11.1"} |
+--------------------------------------+------+-------------------+----------------------
----------------------------------------------------------------+
|
从VM1的port信息里面我们得知,数据是从qvof76ecb29-5d口进入br-int的。我们再看看br-int上的数据包,从上面的port信息我们查看到了相应的MAC地址,知道数据包是从VM1的MAC发到它gateway的MAC上的。然后在namespace里面通过VM2的gateway端口转发出来。
|
1
2
3
4
5
6
7
8
9
10
11
12
13
14
15
16
17
18
19
20
21
22
23
|
[root@test115 ~]# ovs-ofctl dump-flows br-int
NXST_FLOW reply (xid=0x4):
cookie=0x0, duration=16439.298s, table=0, n_packets=476, n_bytes=46648, idle_age=8917,
priority=2,in_port=31,dl_src=fa:16:3f:ec:09:21 actions=resubmit(,1)
cookie=0x0, duration=16439.451s, table=0, n_packets=0, n_bytes=0, idle_age=16439,
priority=4,in_port=30,dl_src=fa:16:3f:ec:09:21 actions=resubmit(,2)
cookie=0x0, duration=16439.645s, table=0, n_packets=0, n_bytes=0, idle_age=16439,
priority=2,in_port=31,dl_src=fa:16:3f:1a:cf:03 actions=resubmit(,1)
cookie=0x0, duration=16439.802s, table=0, n_packets=0, n_bytes=0, idle_age=16439,
priority=4,in_port=30,dl_src=fa:16:3f:1a:cf:03 actions=resubmit(,2)
cookie=0x0, duration=16440.644s, table=0, n_packets=1074, n_bytes=104318, idle_age=8917,
priority=1 actions=NORMAL
cookie=0x0, duration=16440.570s, table=0, n_packets=612165, n_bytes=339552066, idle_age=0,
priority=2,in_port=30 actions=drop
cookie=0x0, duration=16440.800s, table=1, n_packets=0, n_bytes=0, idle_age=16440,
priority=1 actions=drop
cookie=0x0, duration=16431.564s, table=1, n_packets=476, n_bytes=46648, idle_age=8917,
priority=4,dl_vlan=2,dl_dst=fa:16:3e:17:6b:a7
actions=strip_vlan,mod_dl_src:fa:16:3e:cd:50:8d,output:27
cookie=0x0, duration=16440.720s, table=2, n_packets=0, n_bytes=0, idle_age=16440,
priority=1 actions=drop
cookie=0x0, duration=16440.874s, table=23, n_packets=0, n_bytes=0, idle_age=16440,
priority=0 actions=drop
|
VM1要ping的是VM2,它们是在不同的网段上。通过namespace,使得192.168.12.1和192.168.11.1这两个gateway能够联通,就把不同的两个网段联通起来。
|
1
2
3
4
5
6
7
8
9
10
11
12
13
14
15
16
17
18
19
20
21
22
23
24
25
|
[root@test115 ~]# ip netns exec qrouter-a49eee39-7977-4a7f-81e1-dcbf57dbd904 ifconfig -a
lo: flags=73<UP,LOOPBACK,RUNNING> mtu 65536
inet 127.0.0.1 netmask 255.0.0.0
inet6 ::1 prefixlen 128 scopeid 0x10<host>
loop txqueuelen 0 (Local Loopback)
RX packets 0 bytes 0 (0.0 B)
RX errors 0 dropped 0 overruns 0 frame 0
TX packets 0 bytes 0 (0.0 B)
TX errors 0 dropped 0 overruns 0 carrier 0 collisions 0
qr-43fad9d6-53: flags=4163<UP,BROADCAST,RUNNING,MULTICAST> mtu 1500
inet 192.168.12.1 netmask 255.255.255.0 broadcast 192.168.12.255
inet6 fe80::f816:3eff:fea3:95c2 prefixlen 64 scopeid 0x20<link>
ether fa:16:3e:a3:95:c2 txqueuelen 0 (Ethernet)
RX packets 2 bytes 140 (140.0 B)
RX errors 0 dropped 0 overruns 0 frame 0
TX packets 2644 bytes 141732 (138.4 KiB)
TX errors 0 dropped 0 overruns 0 carrier 0 collisions 0
qr-c669122c-11: flags=4163<UP,BROADCAST,RUNNING,MULTICAST> mtu 1500
inet 192.168.11.1 netmask 255.255.255.0 broadcast 192.168.11.255
inet6 fe80::f816:3eff:fecd:508d prefixlen 64 scopeid 0x20<link>
ether fa:16:3e:cd:50:8d txqueuelen 0 (Ethernet)
RX packets 4091 bytes 395426 (386.1 KiB)
RX errors 0 dropped 0 overruns 0 frame 0
TX packets 3564 bytes 420291 (410.4 KiB)
TX errors 0 dropped 0 overruns 0 carrier 0 collisions 0
|
192.168.11.0/24和192.168.12.0/24这两个网段的通信是分别通过qr-c669122c-11和qr-43fad9d6-53两个端口,因为 namespace的存在,它们本身是能够通信的。
[root@test115 ~]# ip netns exec qrouter-a49eee39-7977-4a7f-81e1-dcbf57dbd904 ip route list table main
|
1
2
|
192.168.11.0/24 dev qr-c669122c-11 proto kernel scope link src 192.168.11.1
192.168.12.0/24 dev qr-43fad9d6-53 proto kernel scope link src 192.168.12.1
|
在compute1节点的namespace上能够得到192.168.12.9的MAC地址及状态。并且在compute2节点的namespace上能够得到 192.168.11.14的MAC地址及状态。这些都保证了两台VM的顺利通信。
|
1
2
3
4
5
6
7
|
[root@test115 ~]# ip netns exec qrouter-a49eee39-7977-4a7f-81e1-dcbf57dbd904 ip nei
fe80::f4ce:f9ff:fe73:ef0d dev qr-c669122c-11 lladdr f6:ce:f9:73:ef:0d STALE
fe80::f816:3eff:fe17:6ba7 dev qr-c669122c-11 lladdr fa:16:3e:17:6b:a7 STALE
192.168.12.10 dev qr-43fad9d6-53 lladdr fa:16:3e:d4:4d:ff PERMANENT
192.168.11.14 dev qr-c669122c-11 lladdr fa:16:3e:17:6b:a7 PERMANENT
192.168.12.9 dev qr-43fad9d6-53 lladdr fa:16:3e:2a:34:19 PERMANENT
192.168.11.13 dev qr-c669122c-11 lladdr fa:16:3e:02:b7:c7 PERMANENT
|
数据包流入br-int之后,打上了tag 2标志,接着patch-tun把br-int接入隧道桥br-tun,我们看到patch-tun和patch-int是对应的端口,我们通过查看br-tun上的端口情况得知数据流是从port 8进入br-tun的。
|
1
2
3
4
5
6
7
8
9
10
11
12
13
14
15
16
17
18
19
20
21
22
23
|
[root@test115 ~]# ovs-ofctl show br-tun
OFPT_FEATURES_REPLY (xid=0x2): dpid:00007e2d16238847
n_tables:254, n_buffers:256
capabilities: FLOW_STATS TABLE_STATS PORT_STATS QUEUE_STATS ARP_MATCH_IP
actions: OUTPUT SET_VLAN_VID SET_VLAN_PCP STRIP_VLAN SET_DL_SRC SET_DL_DST
SET_NW_SRC SET_NW_DST SET_NW_TOS SET_TP_SRC SET_TP_DST ENQUEUE
8(patch-int): addr:f6:78:56:1e:33:fa
config: 0
state: 0
speed: 0 Mbps now, 0 Mbps max
9(gre-0a0b0172): addr:d6:4a:8e:14:bc:63
config: 0
state: 0
speed: 0 Mbps now, 0 Mbps max
10(gre-0a0b0174): addr:8a:c7:68:16:44:d8
config: 0
state: 0
speed: 0 Mbps now, 0 Mbps max
LOCAL(br-tun): addr:7e:2d:16:23:88:47
config: PORT_DOWN
state: LINK_DOWN
speed: 0 Mbps now, 0 Mbps max
OFPT_GET_CONFIG_REPLY (xid=0x4): frags=normal miss_send_len=0
|
首先注意一下,数据流在进入br-tun之前,数据包已经转化成了从VM1的MAC ping 192.168.12.1的MAC。我们查看一下数据在br-tun上的流表。数据首先流入table0,流入端口是port 8。接着进入table1,流入地址就是192.168.12.1的MAC地址,它转变成了compute1的MAC地址,这个MAC地址我们可以从db2里面得到。接着进入table2, 因为ping用的协议是ICMP,所以这里定位粗体字的这条数据流。接着进入table20,从上面的port list表中,我们可以看到,数据流最终指向VM2(192.168.12.9), 数据包从隧道set_tunnel:0x2, port 10 流出。
|
1
2
3
4
5
6
7
8
9
10
11
12
13
14
15
16
17
18
19
20
21
22
23
24
25
26
27
|
[root@test115 ~]# ovs-ofctl dump-flows br-tun
NXST_FLOW reply (xid=0x4):
cookie=0x0, duration=108352.425s, table=0, n_packets=0, n_bytes=0, idle_age=65534,
hard_age=65534, priority=0 actions=drop
cookie=0x0, duration=108343.696s, table=0, n_packets=476, n_bytes=46648, idle_age=65534,
hard_age=65534, priority=1,in_port=10 actions=resubmit(,3)
cookie=0x0, duration=108351.277s, table=0, n_packets=496, n_bytes=49088,
idle_age=2304, hard_age=65534, priority=1,in_port=8 actions=resubmit(,1)
cookie=0x0, duration=108344.223s, table=0, n_packets=6, n_bytes=1236, idle_age=2304,
hard_age=65534, priority=1,in_port=9 actions=resubmit(,3)
cookie=0x0, duration=108351.106s, table=1, n_packets=12, n_bytes=1680, idle_age=2304,
hard_age=65534, priority=0 actions=resubmit(,2)
cookie=0x0, duration=108345.552s, table=1, n_packets=476, n_bytes=46648
, idle_age=65534, hard_age=65534, priority=1,dl_vlan=1,dl_src=fa:16:3e:a3:95:c2
actions=mod_dl_src:fa:16:3f:97:87:a1,resubmit(,2)
cookie=0x0, duration=108342.096s, table=1, n_packets=1, n_bytes=130, idle_age=65534,
hard_age=65534, priority=1,dl_vlan=2,dl_src=fa:16:3e:cd:50:8d actions=mod_dl_src:fa:16:3f:97:87:a1,
resubmit(,2)
... ...
cookie=0x0, duration=108352.344s, table=2, n_packets=490, n_bytes=48556,
idle_age=2304, hard_age=65534, priority=0,dl_dst=00:00:00:00:00:00/01:00:00:00:00:00
actions=resubmit(,20)
... ...
cookie=0x0, duration=108343.543s, table=20, n_packets=476, n_bytes=46648, idle_age=65534,
hard_age=65534, priority=2,dl_vlan=1,dl_dst=fa:16:3e:2a:34:19 actions=strip_vlan,
set_tunnel:0x2,output:10
... ...
|
这里是查看host的MAC地址。
|
1
2
3
4
5
6
7
|
db2 => select * from DVR_HOST_MACS
HOST MAC_ADDRESS
---------------------------------------------------------------
test114.sce.ibm.com fa:16:3f:1a:cf:03
test115.sce.ibm.comfa:16:3f:97:87:a1
test116.sce.ibm.com fa:16:3f:ec:09:21
|
compute1是通过gre-0a0b0174与compute2连接起来的
|
1
2
3
4
5
6
7
8
9
10
11
12
13
14
15
16
17
18
19
20
21
22
23
24
25
26
27
|
[root@test115 ~]# ovs-vsctl show
1799e6ea-b3b0-4581-b42e-e1bfd8a5d96d
Bridge br-ex
Port "eth0"
Interface "eth0"
Port br-ex
Interface br-ex
type: internal
Bridge br-tun
fail_mode: secure
Port "gre-0a0b0174"
Interface "gre-0a0b0174"
type: gre
options: {df_default="true", in_key=flow, local_ip="10.11.1.115", out_key= flow,
remote_ip="10.11.1.116"}
Port br-tun
Interface br-tun
type: internal
Port patch-int
Interface patch-int
type: patch
options: {peer=patch-tun}
Port "gre-0a0b0172"
Interface "gre-0a0b0172"
type: gre
options: {df_default="true", in_key=flow, local_ip="10.11.1.115", out_key= flow,
remote_ip="10.11.1.114"}
|
下面数据包已经来到了compute2,我们先查看一下compute2上的网络情况,在compute2上,是通过gre-0a0b0173端口与compute1传递数据流的。
|
1
2
3
4
5
6
7
8
9
10
11
12
13
14
15
16
17
18
19
20
21
22
23
24
25
26
27
|
[root@test116 ~]# ovs-vsctl show
590e4ede-0e3c-43c8-ad1c-153c3a101f75
Bridge br-ex
Port "eth0"
Interface "eth0"
Port br-ex
Interface br-ex
type: internal
Bridge br-tun
fail_mode: secure
Port patch-int
Interface patch-int
type: patch
options: {peer=patch-tun}
Port "gre-0a0b0173"
Interface "gre-0a0b0173"
type: gre
options: {df_default="true", in_key=flow, local_ip="10.11.1.116", out_key=flow,
remote_ip="10.11.1.115"}
Port "gre-0a0b0172"
Interface "gre-0a0b0172"
type: gre
options: {df_default="true", in_key=flow, local_ip="10.11.1.116", out_key=flow,
remote_ip="10.11.1.114"}
Port br-tun
Interface br-tun
type: internal
|
数据进入compute2,先进入隧道桥br-tun。我们再来查看一下br-tun上的端口,它是通过port 14传入br-tun的。
|
1
2
3
4
5
6
7
8
9
10
11
12
13
14
15
16
17
18
19
20
21
22
23
|
[root@test116 ~]# ovs-ofctl show br-tun
OFPT_FEATURES_REPLY (xid=0x2): dpid:00008eab3df3f342
n_tables:254, n_buffers:256
capabilities: FLOW_STATS TABLE_STATS PORT_STATS QUEUE_STATS ARP_MATCH_IP
actions: OUTPUT SET_VLAN_VID SET_VLAN_PCP STRIP_VLAN SET_DL_SRC SET_DL_DST SET_NW_SRC
SET_NW_DST SET_NW_TOS SET_TP_SRC SET_TP_DST ENQUEUE
9(patch-int): addr:a2:3b:1e:29:77:9e
config: 0
state: 0
speed: 0 Mbps now, 0 Mbps max
13(gre-0a0b0172): addr:b6:e7:f7:3f:f6:80
config: 0
state: 0
speed: 0 Mbps now, 0 Mbps max
14(gre-0a0b0173): addr:02:2c:97:51:29:f7
config: 0
state: 0
speed: 0 Mbps now, 0 Mbps max
LOCAL(br-tun): addr:8e:ab:3d:f3:f3:42
config: PORT_DOWN
state: LINK_DOWN
speed: 0 Mbps now, 0 Mbps max
OFPT_GET_CONFIG_REPLY (xid=0x4): frags=normal miss_send_len=0
|
下面查看一下br-tun上面的流表
数据先流入table0,流入端口是port 14,接着数据转入table3,在这里把隧道转成了vlan号,这里的tunnel就是在compute1 上的转换的那个tunnel号,接着数据流入table9, 在这条流上显示流入地址是compute1 host的MAC地址,数据从这里流进 br-int。
|
1
2
3
4
5
6
7
8
9
10
11
12
13
14
|
[root@test116 ~]# ovs-ofctl dump-flows br-tun
NXST_FLOW reply (xid=0x4):
cookie=0x0, duration=1670640.753s, table=0, n_packets=0, n_bytes=0, idle_age=65534,
hard_age=65534, priority=0 actions=drop
cookie=0x0, duration=353441.887s, table=0, n_packets=29, n_bytes=4904, idle_age=7824,
hard_age=65534, priority=1,in_port=13 actions=resubmit(,3)
cookie=0x0, duration=352506.309s, table=0, n_packets=2630, n_bytes=142843,
idle_age=65534, hard_age=65534, priority=1,in_port=14 actions=resubmit(,3)
... ...
cookie=0x0, duration=353442.719s, table=3, n_packets=2648, n_bytes=144638, idle_age=7824,
hard_age=65534, priority=1,tun_id=0x2actions=mod_vlan_vid:3,resubmit(,9)
.... ...
cookie=0x0, duration=1670637.758s, table=9, n_packets=3003, n_bytes=179397, idle_age=65534,
hard_age=65534, priority=1,dl_src=fa:16:3f:97:87:a1 actions=output:9
|
数据包流入br-int先进入的是table0, 数据的流入地址是compute1 host的MAC地址。接着数据进入table1, 到达VM2的MAC,流入地址是192.168.12.1的MAC地址,完成了从gateway到VM的数据转发。至此数据包完成了从VM1到VM2的传递,仅仅在compute节点之间没有经过network节点。
|
1
2
3
4
5
6
7
8
9
10
11
12
13
14
|
[root@test116 ~]# ovs-ofctl dump-flows br-int
NXST_FLOW reply (xid=0x4):
cookie=0x0, duration=1676015.888s, table=0, n_packets=0, n_bytes=0, idle_age=65534, hard_age=65534,
priority=4,in_port=36,dl_src=fa:16:3f:1a:cf:03 actions=resubmit(,2)
cookie=0x0, duration=1676015.270s, table=0, n_packets=3003, n_bytes=179397, idle_age=65534,
hard_age=65534, priority=2,in_port=37,dl_src=fa:16:3f:97:87:a1 actions=resubmit(,1)
... ...
cookie=0x0, duration=357883.384s, table=1, n_packets=531, n_bytes=52038, idle_age=65534,
hard_age=65534, priority=4,dl_vlan=3,dl_dst=fa:16:3e:2a:34:19
actions=strip_vlan,mod_dl_src:fa:16:3e:a3:95:c2,output:38
cookie=0x0, duration=1676017.088s, table=2, n_packets=0, n_bytes=0, idle_age=65534,
hard_age=65534, priority=1 actions=drop
cookie=0x0, duration=1676017.264s, table=23, n_packets=0, n_bytes=0, idle_age=65534,
hard_age=65534, priority=0 actions=drop
|
在compute1节点的namespace上能够得到192.168.12.9的MAC地址及状态。其实在compute2节点的namespace上能够得到192.168.11.14的MAC地址及状态。这些都保证了两台VM的能够顺利的通信。
|
1
2
3
4
5
6
7
|
[root@test115 ~]# ip netns exec qrouter-a49eee39-7977-4a7f-81e1-dcbf57dbd904 ip nei
fe80::f4ce:f9ff:fe73:ef0d dev qr-c669122c-11 lladdr f6:ce:f9:73:ef:0d STALE
fe80::f816:3eff:fe17:6ba7 dev qr-c669122c-11 lladdr fa:16:3e:17:6b:a7 STALE
192.168.12.10 dev qr-43fad9d6-53 lladdr fa:16:3e:d4:4d:ff PERMANENT
192.168.11.14 dev qr-c669122c-11 lladdr fa:16:3e:17:6b:a7 PERMANENT
192.168.12.9 dev qr-43fad9d6-53 lladdr fa:16:3e:2a:34:19 PERMANENT
192.168.11.13 dev qr-c669122c-11 lladdr fa:16:3e:02:b7:c7 PERMANENT
|
参考资料
学习
参考:Neutron/DVR,您可以在这里面找到比较深刻地了解 DVR 的概念,原理等知识。
参考:Neutron/DVR/HowTo,您可以在这里看到一个关于 DVR demo 的视频,还能从中找到如何配置 DVR。
参考:Neutron/DVR L2 Agent,您可以在这里面查看到在 DVR 的 enabled 的时候,数据的流标。
参考:OVS命令详解全部手册内容,您可以在这里面找到你所需要的 OVS 命令
developerWorks 云计算站点 提供了有关云计算的更新资源,包括
- 云计算 简介。
- 更新的 技术文章和教程,以及网络广播,让您的开发变得轻松,专家研讨会和录制会议 帮助您成为高效的云开发人员。
- 连接转为云计算设计的 IBM 产品下载和信息。
- 关于 社区最新话题 的活动聚合。
作者简介:
许薇,软件测试工程师,IBM
李宗恺,软件工程师,IBM
张芸,软件工程师,IBM