1.下载所需的安装包
(Linux下用wget下载,笔者在window下下载的,用XSHELL命令RZ上传到Linux中)
2.安装MySQL
3.创建新用户并授权
图解教程
第一步: 检测系统版本信息
Linux命令: cat /proc/version

当前Linux版本为RedHat 4.1.2-48
Linux命令: uname -a

可以看到当前系统为64位的
第二步:下载mysql Community Server
官方下载地址: http://www.mysql.com/downloads/mysql/
可以选择【Linux-Generic】,下载对应的RMP包.
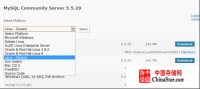
由于当前系统为redhat(64位),所以直接选择 Oracle &Red Hat Linux 4 & 5
Mysql安装包有很多,作用也不同,大多数情况下只需要安装MySQL-Server和MySQL-Client,其它包根据需要安装.
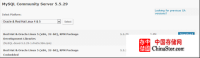
下载下面两个安装包文件
MySQL-server-5.5.28-1.rhel4.x86_64.rpm
MySQL-client-5.5.28-1.rhel4.x86_64.rpm
第三步: 安装MySQL
安装顺序: 先安装服务器,然后再安装客户端
Linux命令: rpm -ivh MySQL-server-5.5.28-1.rhel4.x86_64.rpm
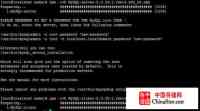
安装后启动MySQL
命令: /etc/init.d/mysql start

出现如上提示,启动成功.
MySQL默认是没有密码的,所以直接可以连接上
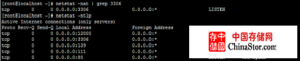
MysQL默认端口为3306,安装启动成功后,可以用命令查看3306端口状态
命令: netstat -nat | grep 3306
或者: netstat -ntlp
第四步: 修改mysql的密码
方法一:
mysql> use mysql;
mysql> desc user;

mysql> select Host, User, Password from user where User='root';
mysql> flush privileges;
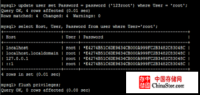
退出重新登录,可以看到mysql密码修改成功

方法二:
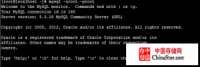
[root@localhost ~]# mysqladmin -u root -p password root
--此处password后的root密码为目标密码
Enter password:
--第二次输入的密码为原始mysql密码,因为默认安装后为空,所以直接enter即可
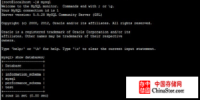
然后用root/root登录
第五步
为mysql创建新用户dennisit/dennist@#!pdp
命令:
insert into mysql.user(Host,User,Password)
values ('localhost','dennist',password('dennist@#!pdp'));

为改用户创建表,并受权限,可是部分授权,也可以全部授权,这里全部授权给表
mysql> create database tb_newusrtb;
mysql> grant all privileges on tb_newusrtb.* to dennisit@localhost identified by 'dennist@#!pdp';
mysql> flush privileges;

至此,所以任务完成,用新建的用户登录数据库
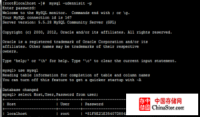
使用命令查看,mysql的用户
mysql> select Host,User,Password from user;

当然,也可以查询其对应的权限.跟一般的sql查询无异.