2.如果要使postfix支持SASL认证需要安装cyrus-sasl相关软件包如图

3.创建运行组及用户如图

4.开始编译安装postfix服务
首先将压缩包解压
配置

编译安装

5.调整主配置文件main.cf

修改配置文件main.cf


启动服务

搭建dns服务创建mx记录,前面有dns搭建的方法不在图解
创建系统账户做为邮件用户如图
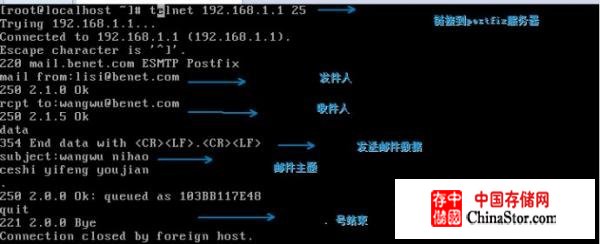
5.现在可以连接postfix服务器的25端口进行测试了

二:配置dovecot服务
dovecot简介:通过以上的postfix配置可以发现服务器可以发送邮件了,但是只能在服务器上查看邮件,dovecot是一个安全性较好的pop3/IMAP服务器软件,通过配置此软件后用户可以在客户端上配置outlook进行收发邮件了。
步骤:
1.首先创建运行用户dovecot和dovenull如图
2.开始编译安装dovecot软件包
首先解包
配置并编译安装


添加系统服务如图

3.调整配置主配置文件
dovecot的主配置文件位于/etc/dovecot目录下,主配置文件为dovecot.conf,默认没有此文件,可以根据参考目录重新创建如图
若要支持系统用户认证,需要建立相应的pam认证文件/etc/pam.d/dovecot如图


修改主配置文件如图


启动服务

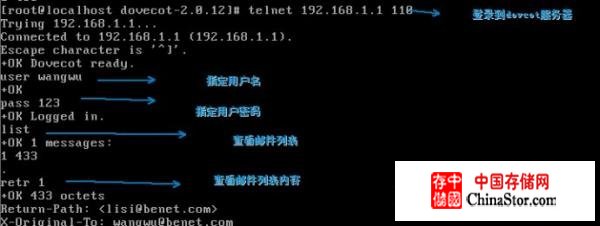
现在可以连接dovecot服务器的110端口进行测试了如图

通过测试可以发现用户已经可以通过dovecot服务器收取邮件了,一台简单的邮件服务器基本上完成了,用户可以通过设置下客户端的outlook就可以收发邮件了。
三:设置SMTP发信认证
1.启用SMTP发信认证:当用户同U哦smtp协议向外部邮件域发送邮件时,服务器会要求用户提供账号和口令进行身份验证,只有通过验证的用户才能够向外部发送邮件。在postfix邮件系统中,可以使用Cyrus SASL软件来实现基本的smtp认证机制。postfix通过调用Cyrus SASL函数库,使用Cyrus SASL提供的认证服务saslauthd来核对系统账号和密码。
2.配置SMTP发信认证步骤:
(1)首先设置Cyrus SASL函数库,并启动saslauthd服务如图


(2)修改main.cf配置文件,添加SMTP认证配置如图


现在可以再服务器上测试下不使用smtp方式是否可以向外部发送邮件如图

测试适用smtp认证方式向外部发送邮件:
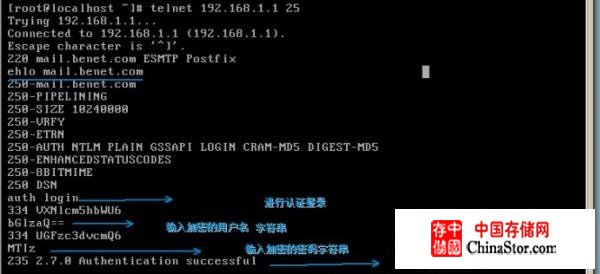
首先适用openssl工具对用户和密码生成加密字串如图
进行登录测试


认证成功,用户可以再客户机上设置自己的outlook等使用smtp认证方式就可以往外部发送邮件了