/ 中存储网

Linux系统配置Nginx支持运行ASP.NET 4程序

2013-09-29 10:00:01 来源:kejihao

在我上一篇博文“在 Linux 操作系统中运行 ASP.NET 4 (下)”中讲述了如何在 openSUSE 11.3 操作系统中使用 Apache 2.2.15 运行 ASP.NET 4。虽然说 Apache 是目前最流行的 HTTP 服务器,但是 Nginx 作为高性能的 HTTP 和反向代理服务器,目前已经得到越来越广泛的应用。国外的网站如 Ohloh、GitHub、SourceForge 等,国内网站如新浪、网易、腾讯等,都已经部署了 Nginx。所以,让我们也在 openSUSE 操作系统中部署一个 Nginx 来运行 ASP.NET 4 吧。

在前一篇博文中,是在我家里的 Dell 本本上的 Windows Vista 操作系统中使用 Oralce VM VirtualBox 4.0 来运行 openSUSE 11.3 虚拟机,当时我家里的 TP-LINK 宽宽路由器提供了 DHCP 服务,可以自动获得网络地址。而现在是我工作单位的一台 Lenovo 台式机上运行着 Ubuntu 10.10 操作系统,使用 Oracle VM VirtualBox 4.0 来运行 OpenSUSE 11.3 虚拟机。此时没有 DHCP 服务,只能使用静态网络地址。在 openSUSE 11.3 操作系统配置静态网络地址的方法如下所示:
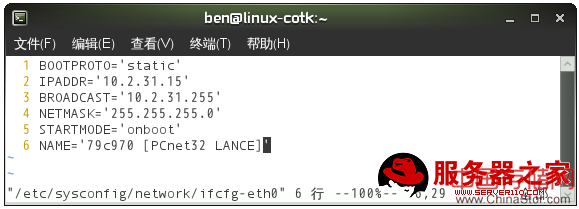
[email protected]:~> sudo vim /etc/sysconfig/network/ifcfg-eth0

[email protected]:~> sudo vim /etc/sysconfig/network/routes

[email protected]:~> sudo vim /etc/sysconfig/network/config

上述步骤的作用是:

修改 /etc/sysconfig/network/ifcfg-eth0 文件,将文件中第 1 行的 BOOTPROTO='dhcp4' 改为 'static',即使用静态网络地址。然后增加第 2 到第 4 行,分别设定 IP 地址为 10.2.31.15、广播地址为 10.2.31.255、子网掩码为 255.255.255.0。

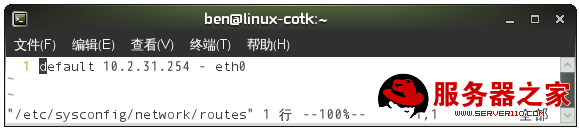
新增 /etc/sysconfig/network/routes 文件,设置网关为 10.2.31.254。

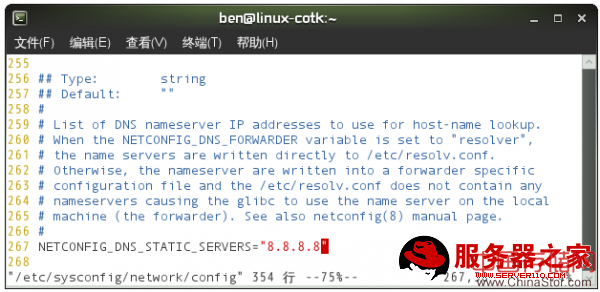
修改 /etc/sysconfig/network/config 文件,设置 DNS 服务,直接设为 Google 提供的免费 DNS: 8.8.8.8。

然后使用以下命令更新网络设置和重新启动网络服务:

[email protected]:~> sudo /sbin/netconfig update -f

[email protected]:~> sudo /etc/init.d/network restart

Shutting down network interfaces:

eth0      device: Advanced Micro Devices [AMD] 79c970 [PCnet32 LANCE] (rev 40)

eth0                                                          done

Shutting down service network  .  .  .  .  .  .  .  .  .          done

Hint: you may set mandatory devices in /etc/sysconfig/network/config

Setting up network interfaces:

eth0      device: Advanced Micro Devices [AMD] 79c970 [PCnet32 LANCE] (rev 40)

eth0      IP address: 10.2.31.15/24

eth0                                                          done

Setting up service network  .  .  .  .  .  .  .  .  .  .          done

SuSEfirewall2: Setting up rules from /etc/sysconfig/SuSEfirewall2 ...

SuSEfirewall2: Warning: no default firewall zone defined, assuming 'ext'

SuSEfirewall2: batch committing...

SuSEfirewall2: Firewall rules successfully set

[email protected]:~> /sbin/ifconfig

eth0      Link encap:Ethernet  HWaddr 08:00:27:75:DD:F6

inet addr:10.2.31.15  Bcast:10.2.31.255  Mask:255.255.255.0

inet6 addr: fe80::a00:27ff:fe75:ddf6/64 Scope:Link

UP BROADCAST RUNNING MULTICAST  MTU:1500  Metric:1

RX packets:1103 errors:0 dropped:0 overruns:0 frame:0

TX packets:187 errors:0 dropped:0 overruns:0 carrier:0

collisions:0 txqueuelen:1000

RX bytes:141042 (137.7 Kb)  TX bytes:59526 (58.1 Kb)

Interrupt:10 Base address:0xd020

lo        Link encap:Local Loopback

inet addr:127.0.0.1  Mask:255.0.0.0

inet6 addr: ::1/128 Scope:Host

UP LOOPBACK RUNNING  MTU:16436  Metric:1

RX packets:14 errors:0 dropped:0 overruns:0 frame:0

TX packets:14 errors:0 dropped:0 overruns:0 carrier:0

collisions:0 txqueuelen:0

RX bytes:820 (820.0 b)  TX bytes:820 (820.0 b)

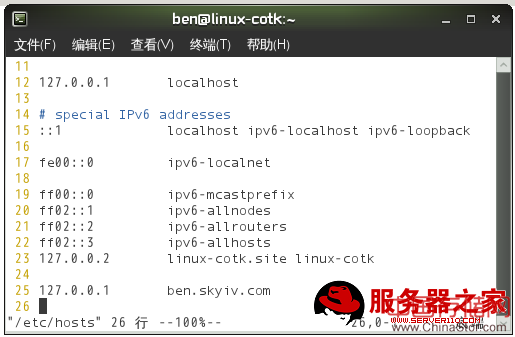
然后使用以下命令在 /etc/hosts 文件中增加 ben.skyiv.com 的域名。注意这里 IP 地址必须是 127.0.0.1。

[email protected]:~> sudo vim /etc/hosts

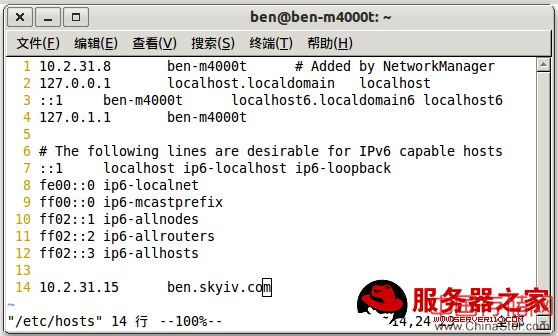
在宿主机的 Ubuntu 10.10 操作系统的 /etc/hosts 文件中也增加一个 ben.skyiv.com 域名,指向 10.2.31.15,即运行 openSUSE 11.3 操作系统的客户机的静态网络地址。

[email protected]:~$ vim /etc/hosts

使用以下命令停止 Apache 服务,并禁止 Apache 服务开机自动启动:

[email protected]:~> sudo /etc/init.d/apache2 status

Checking for httpd2:                                                            running

[email protected]:~> /sbin/chkconfig --list apache2

apache2                   0:off  1:off  2:off  3:on   4:off  5:on   6:off

[email protected]:~>

[email protected]:~> sudo /etc/init.d/apache2 stop

Shutting down httpd2 (waiting for all children to terminate)                    done

[email protected]:~> sudo /sbin/chkconfig -del apache2

insserv: warning: current start runlevel(s) (3 5) of script `vboxadd-x11' overwrites defaults (empty).

apache2                   0:off  1:off  2:off  3:off  4:off  5:off  6:off

[email protected]:~>

[email protected]:~> sudo /etc/init.d/apache2 status

Checking for httpd2:                                                            unused

[email protected]:~> /sbin/chkconfig --list apache2

apache2                   0:off  1:off  2:off  3:off  4:off  5:off  6:off

[email protected]:~>

首先使用以下命令添加 Nginx 所在的安装源到软件仓库,然后更新软件仓库:

[email protected]:~> sudo zypper addrepo http://download.opensuse.org/repositories/openSUSE:/Factory:/Contrib/openSUSE_11.3 openSUSE:Factory:Contrib

正在添加安装源 'openSUSE:Factory:Contrib' [done]

Repository 'openSUSE:Factory:Contrib' successfully added

Enabled: Yes

Autorefresh: No

URI: http://download.opensuse.org/repositories/openSUSE:/Factory:/Contrib/openSUSE_11.3

[email protected]:~> sudo zypper refresh

Repository 'Updates for openSUSE 11.3 11.3-1.82' is up to date.

Repository 'mono-stable' is up to date.

Repository 'openSUSE-11.3 11.3-1.82' is up to date.

Retrieving repository 'openSUSE:Factory:Contrib' metadata []

New repository or package signing key received:

Key ID: 9111972B32099D43

Key Name: openSUSE:Factory:Contrib OBS Project

Key Fingerprint: 9258D0071F2782CCE2E6FE079111972B32099D43

Key Created: 2010年09月21日 星期二 22时27分04秒

Key Expires: 2012年11月29日 星期四 22时27分04秒

Repository: openSUSE:Factory:Contrib

Do you want to reject the key, trust temporarily, or trust always? [r/t/a/?] (r): a

Retrieving repository 'openSUSE:Factory:Contrib' metadata [done]

正在构建 'openSUSE:Factory:Contrib' 安装源缓存 [done]

Repository 'openSUSE-11.3-Non-Oss' is up to date.

Repository 'VirtualBox for openSUSE 11.3' is up to date.

All repositories have been refreshed.

[email protected]:~>

注意在更新软件仓库时要回答“a”表示总是信任这个安装源。然后例行地更新一次软件包:

[email protected]:~> sudo zypper update

=====> 意外地进行了漫长地更新 <=====

[email protected]:~> sudo zypper dist-upgrade

[email protected]:~>

意外发生,居然进行了漫长地更新,看一下具体信息,原来是升级 mono 2.8.2。赶紧到 mono 官方网站的下载页面去看看,果真发布了新的 mono 2.8.2 版本。

现在可以使用以下命令安装 Nginx 下:

[email protected]:~> sudo zypper install nginx-0.8

Loading repository data...

Reading installed packages...

Resolving package dependencies...

The following NEW package is going to be installed:

  nginx-0.8

1 new package to install.

Overall download size: 381.0 KiB. After the operation, additional 1.2 MiB will be used.

Continue? [y/n/?] (y):

Retrieving package nginx-0.8-0.8.54-2.1.i586 (1/1), 381.0 KiB (1.2 MiB unpacked)

Retrieving: nginx-0.8-0.8.54-2.1.i586.rpm [done (26.6 KiB/s)]

Installing: nginx-0.8-0.8.54-2.1 [done]

Additional rpm output:

insserv: warning: current start runlevel(s) (3 5) of script `vboxadd-x11' overwrites defaults (empty).

[email protected]:~>

安装过程非常快,因为只需下载 381 KB 的文件,可见 Nginx 是多么的小巧了。

首先使用以下命令启动 Nginx,并让 Nginx 开机时自动运行:

[email protected]:~> /sbin/chkconfig --list nginx

nginx                     0:off  1:off  2:off  3:off  4:off  5:off  6:off

[email protected]:~> sudo /sbin/service nginx status

Checking for service nginx                                                      unused

[email protected]:~>

[email protected]:~> sudo /sbin/chkconfig -add nginx

insserv: warning: current start runlevel(s) (3 5) of script `vboxadd-x11' overwrites defaults (empty).

nginx                     0:off  1:off  2:off  3:on   4:off  5:on   6:off

[email protected]:~> sudo /sbin/service nginx start

Starting nginx                                                                  done

[email protected]:~>

[email protected]:~> /sbin/chkconfig --list nginx

nginx                     0:off  1:off  2:off  3:on   4:off  5:on   6:off

[email protected]:~> sudo /sbin/service nginx status

Checking for service nginx                                                      running

[email protected]:~>

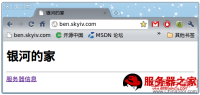
这时,Nginx 已经可以正常使用了。让我们在宿主机的 Ubuntu 10.10 操作系统中访问客户机 openSUSE 11.3 操作系统中的 Nginx 吧,如下图所示:

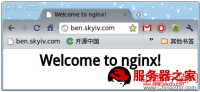
我们知道,openSUSE 操作系统默认情况下网站的内容是在 /srv/www/htdocs 目录下,因此上图中显示的是 
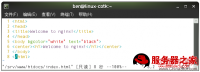
Nginx 安装时生成的 /srv/www/htdocs/index.html 文件的内容,如下所示:

[email protected]:~> view /srv/www/htdocs/index.html

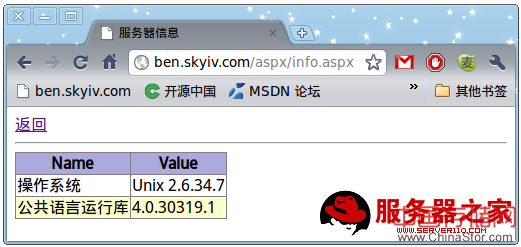
现在让我们输入一个不存在的 URL: http://ben.skyiv.com/none,如下图所示:

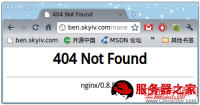
如我们所料地出现了“404 Not Found”错误。页末显示 Nginx 的版本为 0.8.54,这已经最新的稳定版了。

Nginx 的配置文件是 /etc/nginx/nginx.conf,让我们修改这个文件,加上自己的网站吧:

[email protected]:~> sudo vim /etc/nginx/nginx.conf

[email protected]:~> sudo vim /etc/nginx/fastcgi_params

[email protected]:~> sudo vim /etc/init.d/nginx

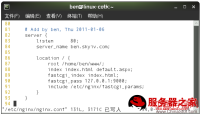
注意 /etc/nginx/nginx.conf 文件中第 89 行 fastcgi_index 后面只能跟一个参数,指明在 ASP.NET 网站的主目录的默认页面文件是什么,我在这里指定为 index.html,有些人也可能会喜欢用 default.aspx 代替。

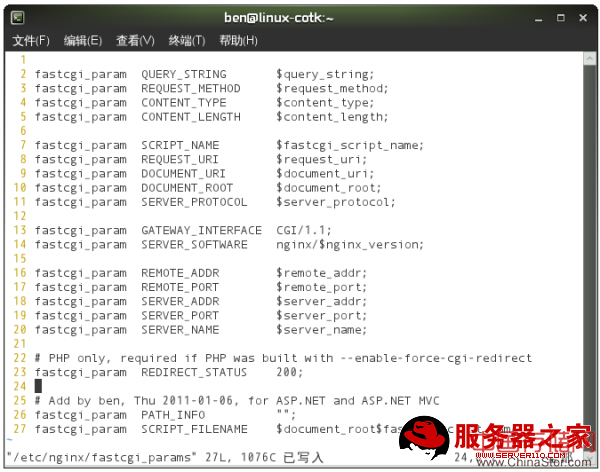
上图中已经是完整的 /etc/nginx/fastcgi_params 文件,其中最后三行是我添加的。

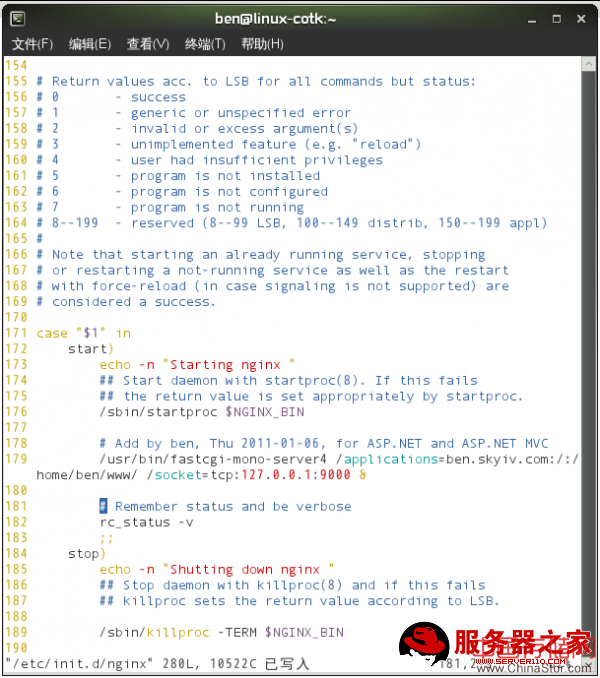
这个 /etc/init.d/nginx 就是 Nginx 启动、停止、重启等的脚本文件,其中第 178 行到第 179 行中我添加的,以便使 Mono FastCGI 服务随同 Nginx 一起启动。

最后,不要忘记重启 Nginx 服务,以使用我们修改的配置生效:

[email protected]:~> sudo /etc/init.d/nginx restart

Shutting down nginx                                                  done

Starting nginx                                                       done

已经一切就绪,可以在宿主机的 Ubuntu 10.10 操作系统上来访问运行于 openSUSE 11.3 操作系统中 Nginx 上的 ASP.NET 4 网站了: