一、基于域名的虚拟主机的配置;
1、我们在此复习一下DNS的配置;
[[email protected] /]# hostname
mgmserver.com
[root@/]#yum install bind*
[[email protected] /]#rpm -ivh /var/cdiso/Server/caching-nameserver-9.3.6-4.P1.el5.i386.rpm
[[email protected] /]# cd /var/named/chroot/etc/
[[email protected] etc]# cp -p named.caching-nameserver.conf named.conf
[[email protected] etc]#vi named.conf
其他的不用修改只在视图里面添加zone就可以了;
view localhost_resolver {
match-clients { any; };
match-destinations { any; };
recursion yes;
include "/etc/named.rfc1912.zones";
zone "mgmserver.com" {
type master;
file "mgmserver.com.zone";
allow-update { any;};
};
zone "0.168.192.in-addr.arpa" {
type master;
file "192.168.0.rev";
allow-update { any;};
};
[[email protected] etc]# cd ../var/named/
下面有很多模板文件。Named.ca就是根区域的数据库文件,localhost.zone这个是正向解析的数据库文件,named.local这个是反向解析的数据库文件。
[[email protected] named]# cp localhost.zone mgmserver.com.zone
[[email protected] named]# cp named.local 192.168.0.rev
编辑 这两个文件
[[email protected] named]#vi mgmserver.com.zone
$TTL 86400
@ IN SOA mgmserver.com. root.mgmserver.com. (
1997022700 ; Serial
28800 ; Refresh
14400 ; Retry
3600000 ; Expire
86400 ) ; Minimum
IN NS mgmserver.com.
IN MX 10 mail.mgmserver.com.
mail IN A 192.168.0.28
server IN A 192.168.0.33
www IN A 192.168.0.28
web IN CNAME www.mgmserver.com.
[[email protected] named]#vi 192.168.0.rev
$TTL 86400
@ IN SOA mgmserver.com. root.mgmserver.com. (
42 ; serial (d. adams)
3H ; refresh我
15M ; retry
1W ; expiry
1D ) ; minimum
IN NS mgmserver.com.
28 IN PTR mgmserver.com.
33 IN PTR server.mgmserver.com.
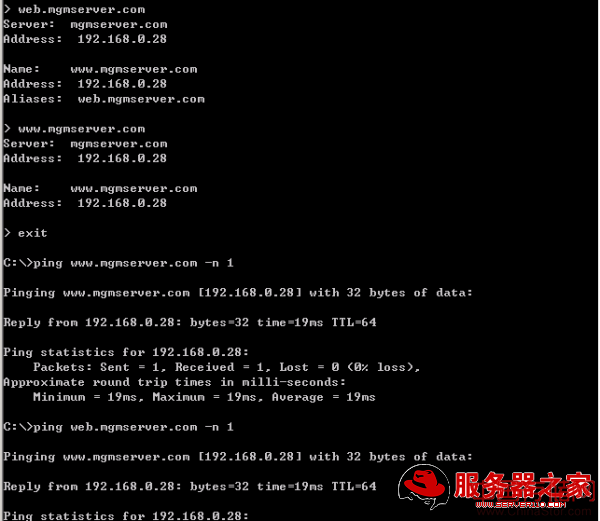
简单的配置一下,我们要使用的www.mgmserver.com 与web.mgmserver.com这两个域名来测试;
[[email protected] named]# named-checkconf /var/named/chroot/etc/named.conf
[[email protected] named]# service named restart
停止 named: [确定]
启动 named: [确定]
我们到另外一台机器测试

到这里我们的为nginx的配置www.mgmserver.com 与web.mgmserver.com这两个域名都可以使用过了;
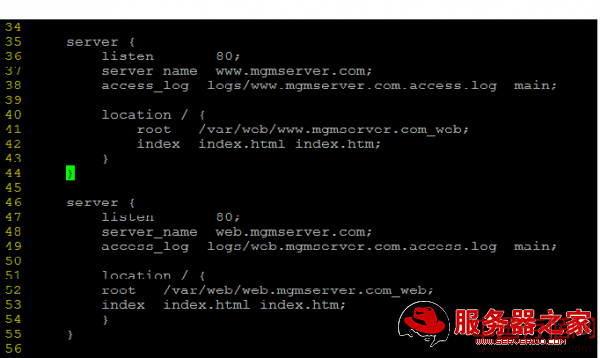
2、配置nginx配置文件,添加两个虚拟主机
[[email protected] conf]# vi nginx.conf

[[email protected] www.mgmserver.com_web]# /usr/local/nginx/sbin/nginx -t -c /usr/local/nginx/conf/nginx.conf
[emerg]: "server" directive is not allowed here in /usr/local/nginx/conf/nginx.conf:45
configuration file /usr/local/nginx/conf/nginx.conf test failed 第一次出现错误提示,查找原来是少了一个大括号,添加上就可以了;在检测就OK了;
[[email protected] www.mgmserver.com_web]# /usr/local/nginx/sbin/nginx -t -c /usr/local/nginx/conf/nginx.conf
the configuration file /usr/local/nginx/conf/nginx.conf syntax is ok
configuration file /usr/local/nginx/conf/nginx.conf test is successful
[[email protected] www.mgmserver.com_web]# /usr/local/nginx/sbin/nginx -c /usr/local/nginx/conf/nginx.conf
启动nginx
[[email protected] conf]# cd /var/web/
[[email protected] web]# ls
web.mgmserver.com_web www.mgmserver.com_web
在这两个目录里面分别建立一个index.html文件保存
到另外一个server2003上面测试


两个静态页面已基本OK;
二、基于IP的虚拟之际的配置;
[[email protected] conf]# ifconfig
eth0 Link encap:Ethernet HWaddr 00:00:6C:BD:F3:00
inet addr:192.168.0.28 Bcast:192.168.0.255 Mask:255.255.255.0
inet6 addr: fe80::200:6cff:febd:f300/64 Scope:Link
UP BROADCAST RUNNING MULTICAST MTU:1500 Metric:1
RX packets:19200 errors:0 dropped:0 overruns:0 frame:0
TX packets:9925 errors:0 dropped:0 overruns:0 carrier:0
collisions:0 txqueuelen:1000
RX bytes:1680955 (1.6 MiB) TX bytes:1308926 (1.2 MiB)
Interrupt:50 Base address:0x4000
lo Link encap:Local Loopback
inet addr:127.0.0.1 Mask:255.0.0.0
inet6 addr: ::1/128 Scope:Host
UP LOOPBACK RUNNING MTU:16436 Metric:1
RX packets:269 errors:0 dropped:0 overruns:0 frame:0
TX packets:269 errors:0 dropped:0 overruns:0 carrier:0
collisions:0 txqueuelen:0
RX bytes:24484 (23.9 KiB) TX bytes:24484 (23.9 KiB)
[[email protected] ~]# ifconfig eth0:1 192.168.0.37 broadcast 192.168.0.255 netmask 255.255.255.0 up
[[email protected] ~]# route add -host 192.168.0.37 dev eth0:1
[[email protected] ~]# ifconfig eth0:2 192.168.0.38 broadcast 192.168.0.255 netmask 255.255.255.0 up
[[email protected] ~]# route add -host 192.168.0.38 dev eth0:2
[[email protected] ~]# ifconfig
eth0 Link encap:Ethernet HWaddr 00:00:6C:BD:F3:00
inet addr:192.168.0.28 Bcast:192.168.0.255 Mask:255.255.255.0
inet6 addr: fe80::200:6cff:febd:f300/64 Scope:Link
UP BROADCAST RUNNING MULTICAST MTU:1500 Metric:1
RX packets:20209 errors:0 dropped:0 overruns:0 frame:0
TX packets:10625 errors:0 dropped:0 overruns:0 carrier:0
collisions:0 txqueuelen:1000
RX bytes:1768186 (1.6 MiB) TX bytes:1390606 (1.3 MiB)
Interrupt:50 Base address:0x4000
eth0:1 Link encap:Ethernet HWaddr 00:00:6C:BD:F3:00
inet addr:192.168.0.37 Bcast:192.168.0.255 Mask:255.255.255.0
UP BROADCAST RUNNING MULTICAST MTU:1500 Metric:1
Interrupt:50 Base address:0x4000
eth0:2 Link encap:Ethernet HWaddr 00:00:6C:BD:F3:00
inet addr:192.168.0.38 Bcast:192.168.0.255 Mask:255.255.255.0
UP BROADCAST RUNNING MULTICAST MTU:1500 Metric:1
Interrupt:50 Base address:0x4000
lo Link encap:Local Loopback
inet addr:127.0.0.1 Mask:255.0.0.0
inet6 addr: ::1/128 Scope:Host
UP LOOPBACK RUNNING MTU:16436 Metric:1
RX packets:281 errors:0 dropped:0 overruns:0 frame:0
TX packets:281 errors:0 dropped:0 overruns:0 carrier:0
collisions:0 txqueuelen:0
RX bytes:25797 (25.1 KiB) TX bytes:25797 (25.1 KiB)
从另外一台win2003上测试

结果都是通的;通过使用ifconfig与route添加的ip地址别名在服务器重启后就会消失了,可以将这两条语句添加到/etc/rc.local 文件中,让系统开机时自动运行;
#vi /etc/rc.local
ifconfig eth0:1 192.168.0.37 broadcast 192.168.0.255 netmask 255.255.255.0 up
route add -host 192.168.0.37 dev eth0:1
ifconfig eth0:2 192.168.0.38 broadcast 192.168.0.255 netmask 255.255.255.0 up
route add -host 192.168.0.38 dev eth0:2
保存就可以了;
下面我们在nginx的配置文件中nginx.conf分别对192.168.0.28 ,192.168.0.37,192.168.0.38三个IP配置虚拟主机,
server {
listen 192.168.0.28:80;
server_name 192.168.0.28;
access_log logs/192.168.0.28.access.log main;
location / {
root /var/web/192.168.0.28;
index index.html index.htm;
}
}
server {
listen 192.168.0.37:80;
server_name 192.168.0.37;
access_log logs/192.168.0.37.access.log main;
location / {
root /var/web/192.168.0.37;
index index.html index.htm;
}
}
server {
listen 192.168.0.38:80;
server_name 192.168.0.38;
access_log logs/192.168.0.38.access.log main;
location / {
root /var/web/192.168.0.38;
index index.html index.htm;
}
}
[[email protected] ~]# kill -QUIT `cat /usr/local/nginx/logs/nginx.pid`
[[email protected] ~]# ps -ef |grep nginx
root 5284 4213 0 13:39 pts/2 00:00:00 vi nginx.conf
root 5356 4053 0 13:49 pts/1 00:00:00 grep nginx
[[email protected] ~]# /usr/local/nginx/sbin/nginx -t -c /usr/local/nginx/conf/nginx.conf
the configuration file /usr/local/nginx/conf/nginx.conf syntax is ok
configuration file /usr/local/nginx/conf/nginx.conf test is successful
[[email protected] ~]# /usr/local/nginx/sbin/nginx -c /usr/local/nginx/conf/nginx.conf
在/var/web下面分别建立三个目录
192.168.0.28 192.168.0.37 192.168.0.38
分别在三个目录中放一个index.html 文件 分别写上自己的IP地址;
从win2003上面访问;


上面就是nginx基于域名、ip访问的配置,掌握住格式,就很好配置了。