原来很多人都用 Lighttpd 的 Spawn-fcgi 进行 FastCGI 模式下的管理工作,不过有不少缺点。而 PHP-fpm 的出现多少缓解了一些问题,但 PHP-fpm 有个缺点就是要重新编译,这对于一些已经运行的环境可能有不小的风险(refer)。 原来 spawn-fcgi 版本也比较乱的,期待独立后的项目能更稳定一些。这会给很多 Web 站点带来便利。
PHP-FPM 是 一个 PHP FastCGI 进程管理器
FastCGI是一个可伸缩的,高速地在web server和脚本语言间交互的接口。FastCGI的主要优点是把动态语言和web server分离开来。这种技术允许把web server和动态语言运行在不同的主机上,以大规模扩展和改进安全性而不损失生产效率。
php-fpm可以和任何支持远端FastCGI的web server工作。
CGI全称是“公共网关接口”(Common Gateway Interface),HTTP服务器与你的或其它机器上的程序进行“交谈”的一种工具,其程序须运行在网络服务器上。 CGI可以用任何一种语言编写,只要这种语言具有标准输入、输出和环境变量。如php,perl,tcl等
Nginx 0.8.46+PHP 5.2.14(FastCGI)服务器在3万并发连接下,开启的10个Nginx进程消耗150M内存(15M*10=150M),开启的64个php-cgi进程消耗1280M内存(20M*64=1280M),加上系统自身消耗的内存,总共消耗不到2GB内存。如果服务器内存较小,完全可以只开启25个php-cgi进程,这样php-cgi消耗的总内存数才500M
目前在HTTPServer这块基本可以看到有三种stack比较流行:
>Apache+mod_php5
>lighttp+spawn-fcgi
>nginx+PHP-FPM
三者后两者性能可能稍优,但是Apache由于有丰富的模块和功能,目前来说仍旧是老大。有人测试nginx+PHP-FPM在高并发情况下可能会达到 Apache+mod_php5的5~10倍,现在nginx+PHP-FPM使用的人越来越多。
下面着重介绍stack:
Apache+mod_php5和nginx+PHP-FPM的安装和配置。对于lighttpd+spawn-fcgi,由于我个人没有怎么用过,所以 如下不准备介绍,感兴趣可以查阅资料。
我们很久一段时间使用经典的Apache+mod_php:
Apache对PHP的支持是通过Apache的模块来支持的。如果曾源代码编译安装php的话,如果希望Apache支持PHP的话,在./configure步骤需要指定--with-apxs2=/usr/local/apache2/bin/apxs 表示告诉编译器通过Apache的mod_php5/apxs来提供对PHP5的解析;
而且在最后一步make install的时候我们会看到将动态链接库libphp5.so(Apache模块)拷贝到apache2的安装目录的modules目录下,并且还需 要在 模块加载进来,从而实现Apache对php的支持。
1)由于该模式实在太经典了,因此这里关于安装部分不准备详述了,相对来说比较简单。
2)这里之所以仍旧列出来Apache+mod_php5来讨论,是因为:
看过上一篇文章的话,我们知道nginx一般包括两个用途HTTPServer和Reverse Proxy Server(反向代理服务器)。
我们介绍了如何在前端部署nginx作为reverse proxy server,后端布置多个Apache来实现机群系统server cluster架构的。
因此,实际生产中,我们仍旧能够保留Apache+mod_php5的经典App Server,而仅仅使用nginx来当做前端的reverse proxy server来实现代理和负载均衡。 因此,建议nginx(1个或者多个)+多个apache的架构继续使用下去。
1)通过上面的分析,尽管我们可以仍旧保留Apache+mod_php来处理PHP,所有的静态文件和负载均衡由顶在前端的nginx来完成,但是由 于nginx和PHP-FPM各自的优越性,使得nginx+PHP-FPM的组合的性能已经很超越Apache+mod_php。
因此很多人渐渐放弃了Apache+mod_php的组合了,而完全使用nginx+PHP-FPM来实现对PHP的处理。
因此现在出现了新的名词叫做LEMP(Linux+EngineX(nginx)+MySQL+PHP),慢慢要代替经典很多年的 LAMP 。
2)甚至出现一种新的server cluster:
其中看不到Apache的影子了,全部由nginx来搞定。nginx轻量型,高性能,高灵活性使得它完全能够应付过来。
由于PHP-FPM是C/S结构,因此我们前端保留nginx来做负载均衡;对于之前后端的各个Apache服务器,我们不需要安装Apache了,对 PHP重新编译安装使其以PHP-FPM方式支持FastCGI;
然后在nginx中配置将客户端的php请求分别pass到后台的多个运行的PHP-FPM,后者进行处理然后返回给nginx,然后显示给用户。整个过 程可以完全不要Apache。
3) 下面我们具体来介绍如何来安装和简单配置
nginx+PHP+PHP-FPM+MySQL.
这里之所以首先要安装MySQL,是因为之后编译安装PHP的时候,可以直接指定对MySQL的支持。
我们知道PHP对MySQL的支持是通过PHP扩展实现的。 上面先介绍一下,言归正传
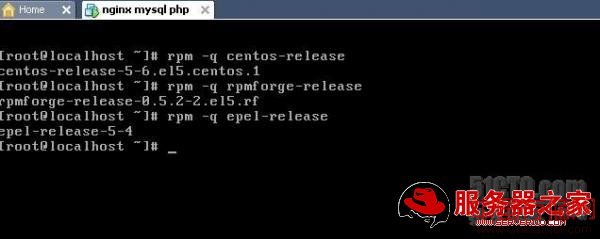
刚开始检查一下 yum-fastestmirror.noarch软件包,如果没有请用yum -y install 来安装。
添加安装源
rpmforge源
[[email protected] ~]# rpm -ivh rpmforge-release-0.5.2-2.el5.rf
启用 EPEL
[[email protected] ~]#rpm -ivh epel-release-5-4

Centos 默认官方源中没有nginx 和 php-fpm 所以必须添加第三方源,不然就只能自己编译了。
启用CENTOS的额加包。如果不安装,可能会出现不能安装NGINX的问题

第一步:安装mysql5.0,并设置开机自动启动mysql
[[email protected] ~] yum install mysql mysql-server
[[email protected] ~]# service mysqld start
[[email protected] ~]# chkconfig mysqld on
[[email protected] ~]# mysqladmin -u root password ******(密码)
[[email protected] ~]# netstat -alp|grep 'mysql'
tcp 0 0 *:mysql *:* LISTEN 2647/mysqld
unix 2 [ ACC ] STREAM LISTENING 9262 2647/mysqld /var/lib/mysql/mysql.sock
第二步:安装Nginx
[[email protected] ~]# yum install nginx [[email protected] ~]# chkconfig nginx on
[[email protected] ~]# service nginx start
[[email protected] ~]# netstat -lp|grep 'nginx'
tcp 0 0 *:irdmi *:* LISTEN 2722/nginx.conf
[[email protected] ~]service php-fpm on
[[email protected] ~]# service php-fpm start
注意:您可以通过使用rpm -ql nginx来查看安装nginx的RPM包时,都安装了哪些文件
[[email protected] ~]# rpm -ql nginx
/etc/logrotate.d/nginx
/etc/nginx
/etc/nginx/conf.d
/etc/nginx/conf.d/geo.data
/etc/nginx/conf.d/ssl.conf
/etc/nginx/conf.d/upstream-fair.conf
/etc/nginx/conf.d/virtual.conf
/etc/nginx/fastcgi.conf
/etc/nginx/fastcgi.conf.default
/etc/nginx/fastcgi_params
/etc/nginx/fastcgi_params.default
/etc/nginx/koi-utf
/etc/nginx/koi-win
/etc/nginx/mime.types
/etc/nginx/mime.types.default
/etc/nginx/nginx.conf//nginx的主配置文件:/etc/nginx/nginx.conf
/etc/nginx/nginx.conf.default
/etc/nginx/scgi_params
/etc/nginx/scgi_params.default
/etc/nginx/uwsgi_params
/etc/nginx/uwsgi_params.default
/etc/nginx/win-utf
/etc/pam.d/nginx
/etc/rc.d/init.d/nginx
/etc/sysconfig/nginx
/usr/lib/perl5/vendor_perl/5.8.8/i386-linux-thread-multi/auto/nginx
/usr/lib/perl5/vendor_perl/5.8.8/i386-linux-thread-multi/auto/nginx/nginx.so
/usr/lib/perl5/vendor_perl/5.8.8/i386-linux-thread-multi/nginx.pm
/usr/sbin/nginx
/usr/share/doc/nginx-1.0.4
/usr/share/doc/nginx-1.0.4/CHANGES
/usr/share/doc/nginx-1.0.4/CHANGES.mod_zip
/usr/share/doc/nginx-1.0.4/CHANGES.nginx_uploadprogress_module
/usr/share/doc/nginx-1.0.4/ChangeLog.ngx_http_auth_pam_module-1.2
/usr/share/doc/nginx-1.0.4/Changelog.nginx_upload_module
/usr/share/doc/nginx-1.0.4/LICENSE
/usr/share/doc/nginx-1.0.4/README
/usr/share/doc/nginx-1.0.4/README.mod_zip
/usr/share/doc/nginx-1.0.4/README.nginx-upstream-fair
/usr/share/doc/nginx-1.0.4/README.nginx_uploadprogress_module
/usr/share/doc/nginx-1.0.4/README.ngx_http_auth_pam_module-1.2
/usr/share/doc/nginx-1.0.4/example.php.nginx_upload_module
/usr/share/doc/nginx-1.0.4/nginx.conf.mod_zip
/usr/share/doc/nginx-1.0.4/nginx.conf.nginx_upload_module
/usr/share/doc/nginx-1.0.4/upload.html.nginx_upload_module
/usr/share/man/man3/nginx.3pm.gz
/usr/share/nginx
/usr/share/nginx/html //nginx默认站点的工作目录:/usr/share/nginx/html
/usr/share/nginx/html/404.html
/usr/share/nginx/html/50x.html
/usr/share/nginx/html/index.html
/var/lib/nginx
/var/lib/nginx/tmp
/var/log/nginx
第三步:安装PHP5 在使用FastCGI方式运行php的时候,如果我们改变了php.ini的设置,就得重新启动php的fastcgi守护程序。如果你的系统负载 比较大的话,这个重启过程或许会让你的系统中断服务一段时间。php-fpm就是为了解决这个问题而诞生的,它可以在php的fastcgi进程不中断的 情况下重新加载你改动过的php.ini。而且php-fpm可以不用再依赖其它的fastcgi启动器,比如lighttpd的spawn-fcgi,对于我来说终于可以摆脱lighttpd的影子了。
[[email protected] ~]# yum install php-fpm php-cli php-mysql php-gd php-imap php-ldap php-odbc php-pear php-xml php-xmlrpc php-snmp php-mcrypt php-mhash php-mbstring php-dba php-bcmath php-tidy php-ncurses php-jpgraph
第四步:配置php
[[email protected] ~]# echo cgi.fix_pathinfo = 1 >>/etc/php.ini
第五步:配置Nginx
[[email protected] ~]# vi /etc/nginx/nginx.conf
worker_processes 5; #增加worker process的数量
keepalive_timeout 3; #设置keepalive_timeout为一个合理值
#修改默认的虚拟主机
server {
listen 80;//端口可以自己修改
server_name _;
location / {
root /usr/share/nginx/html;
index index.php index.html index.htm;//添加index.php
}
error_page 404 /404.html;
location = /404.html {
root /usr/share/nginx/html;
}
error_page 500 502 503 504 /50x.html;
location = /50x.html {
root /usr/share/nginx/html;
}
location ~ .php$ {
root /usr/share/nginx/html;
fastcgi_pass 127.0.0.1:9000;
fastcgi_index index.php;
fastcgi_param SCRIPT_FILENAME /usr/share/nginx/html/$fastcgi_script_name;
include fastcgi_params;
}
location ~ /.ht {
deny all;
}
//nginx配置文件nginx.conf带中文解释
#使用小号
user nobody;
#开启进程数
worker_processes 8;
#制定进程到cpu(四cpu:0001 0010 0100 1000)
worker_cpu_affinity 0001 0010 0100 1000 0001 0010 0100 1000;
#每个进程最大打开文件数
worker_rlimit_nofile 10240;
#进程号保存文件
pid logs/nginx.pid;
events {
#使用epoll(linux2.6的高性能方式)
use epoll;
#每个进程最大连接数(最大连接=连接数x进程数)
worker_connections 10240;
}
http {
#文件扩展名与文件类型映射表
include mime.types;
#默认文件类型
default_type text/html;
#日志文件格式
log_format main '$remote_addr - $remote_user [$time_local] $request '
'"$status" $body_bytes_sent "$http_referer" '
'"$http_user_agent" "$http_x_forwarded_for"';
#日志文件
access_log /dev/null;
#长链接超时时间
keepalive_timeout 30;
#打开gzip压缩
gzip on;
#最小压缩文件大小
gzip_min_length 1000;
#压缩缓冲区
gzip_buffers 4 8k;
#压缩类型
gzip_types text/* text/css application/javascript application/x-javascript;
#压缩比率
gzip_comp_level 9;
#压缩通过代理的所有文件
gzip_proxied any;
#vary header支持
gzip_vary on;
#压缩版本(默认1.1,前端为squid2.5使用1.0)
gzip_http_version 1.0;
#输出缓冲区
output_buffers 4 32k;
#输出拆包大小
postpone_output 1460;
#接收header的缓冲区大小
client_header_buffer_size 128k;
large_client_header_buffers 4 256k;
#客户端发送header超时
client_header_timeout 1m;
#客户端发送内容超时
client_body_timeout 1m;
#发送到客户端超时
send_timeout 1m;
#开启高效文件传输模式
sendfile on;
#捕捉代理端的http错误
#proxy_intercept_errors on;
#默认编码
charset GBK;
#默认域名(不能访问)
server {include port.conf;server_name null;location / {root /dev/null;log_not_found off;}}
#嵌套upstream.conf
include upstream.conf;
#嵌套servers/*.com;
include servers/*.com;
include servers/*.net;
include servers/*.org;
include servers/*.com.cn;
include servers/*.cn;
第六步:测试Nginx
[[email protected] ~]# touch /usr/share/nginx/html/index.php
[[email protected] ~]# vi /usr/share/nginx/html/index.php
phpinfo();
?>
[[email protected] ~]# service nginx restart
[[email protected]~]# elinks 这个是安装 MySQL 时指定的,照填写就ok了。
[[email protected] ~]#elinks 192.168.20.154/phpmyadmin就可以看到了。
安装遇到的问题:
错误一:
phpMyAdmin - Error
Cannot start session without errors, please check errors given in your PHP and/or webserver log file
and configure your PHP installation properly.
[[email protected] ~]# chown root:nginx /var/lib/php/session/
错误二: phpmyadmin主页面上 "链接表的额外特性尚未激活" 的错误
[[email protected] ~]# mysql -u root -p [[email protected] ~]# vi /usr/share/nginx/html/phpmyadmin/config.inc.php
/* User for advanced features */
$cfg['Servers'][$i]['controluser'] = 'root';
$cfg['Servers'][$i]['controlpass'] = 'XXXXX'; #这里输入root用户的密码
/* Advanced phpMyAdmin features */
$cfg['Servers'][$i]['pmadb'] = 'phpmyadmin';
$cfg['Servers'][$i]['bookmarktable'] = 'pma_bookmark';
$cfg['Servers'][$i]['relation'] = 'pma_relation';
$cfg['Servers'][$i]['table_info'] = 'pma_table_info';
$cfg['Servers'][$i]['table_coords'] = 'pma_table_coords';
$cfg['Servers'][$i]['pdf_pages'] = 'pma_pdf_pages';
$cfg['Servers'][$i]['column_info'] = 'pma_column_info';
$cfg['Servers'][$i]['history'] = 'pma_history';
$cfg['Servers'][$i]['designer_coords'] = 'pma_designer_coords';
/* Contrib / Swekey authentication */
$cfg['Servers'][$i]['auth_swekey_config'] = '/etc/swekey-pma.conf'; Nginx指令
-c /to/config> 为 Nginx 指定一个配置文件,来代替缺省的
-t 不运行,而仅仅测试配置文件。nginx 将检查配置文件的语法的正确性,并尝试打开配置文件中所引用到的文件
-v 显示 nginx 的版本
-V 显示 nginx 的版本,编译器版本和配置参数